Journal

The Moccamaster KBG Select: Overview & Brewing Tips

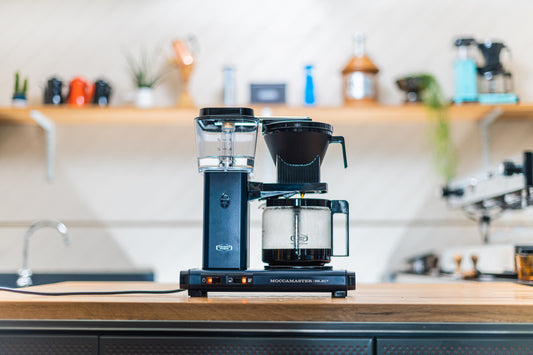
Last year, we created a video offering tips on how to get the most from the Moccamaster KBG that’s proven valuable to many. The more recent release of the Moccamaster KBG Select provided us with the perfect opportunity to revisit our favourite automated filter coffee brewer and take a detailed look at some of its updated features, which includes a switch to adjust water flow for smaller or larger batch sizes. 

We also revisit and expand on some the brewing tips we recommend for getting the most from each batch brewed with the Select, including grind size and recipe recommendations. 

The same overview and brewing tips found within this piece can also be experienced visually and aurally via our video on the brewer, which can be found at the bottom of this entry. 

Breaking down the Moccamaster
Having started manufacturing their products in The Netherlands in 1968, Moccamaster continue to hand make their units there today. The first KBG was first released in 1974 and, whilst the team at Moccamaster have continued to iterate on the original design, you can still clearly see the original silhouette within newer models of this now classic countertop brewer. 

When brewing, the first element you come into contact with is the BPA free plastic reservoir. Labelled with volumetric markings, these provide a very useful guide that ensures you're always adding the right quantity of water for your chosen dose of coffee.

The water then drips through to a copper heating element that sits within the brewer's casing and, once hot, is fed via a glass pipe inside the reservoir through the 9-hole metal shower head. This sprays your water onto your ground coffee, which is housed in a ridged plastic brew basket (also BPA free). These ridges help keep your filter paper away from the basket's walls, helping to promote water flow.

A simple but smart plug is also housed under the basket, which will only open when the glass jug is placed underneath it. This is handy should you wish to experiment with pre-infusion, but also means you should ensure your jug is squarely in place before beginning the brewing process. 

The glass jug is fitted with a lid that includes a thin, black destratification pipe. Descending down into the jug, it aims to help avoid your coffee layering (i.e. not mixing together) and provides more consistent cups. 

What's in the box?
Alongside all of the above, on unboxing your Moccamaster KBG Select, you'll also find a few filter papers, a scoop (although we recommend having scales to hand to ensure you stick to a consistent, repeatable recipe each time), a sachet of cleaner to keep everything clean and scale-free over time, and an instruction manual. Each unit also comes with a 5 year manufacturer's warranty. 

As with any brand new piece of brewing apparatus, we would advise running an empty cycle before brewing coffee. 

The Select switch: a new feature
The new Select switch offers two different flow rates, depicted on the Moccamaster by an icon of a half batch of coffee, and another showing a full batch. This doesn't mean you need to brew batch sizes of exactly 50% or 100%, but it does mean that the rate the water passes through the brewer can be selected to run either more slowly (for smaller batches) or more quickly (for larger batches). 

For us, this is a fantastic and exciting addition to the brewer, as it adds greater flexibility to the brewing process. As well as providing the opportunity for fuller extraction in smaller batch sizes than its predecessor, this additional variable also allows you to offset imperfect grind settings should you need to. For instance, if your hands are tied by pre-ground coffee that's a little too coarse when brewing a full batch, you can run the brewer on the half batch size to achieve a fuller extraction. Equally, if you're pre-ground coffee is finer than you'd ideally like, you can utilise the full batch setting to creater a quicker extraction with a reduced chance of stewed, over-extracted notes. 

Which flow setting for which quantities?
For anything up to and including 750ml of water and 45g of coffee, we would recommend using the half batch setting. For bigger batches of 1L to 1.25L we would suggest the full batch setting. 

Suggested grind sizes

Despite our detailed and ongoing testing across a range of grinders, it is always worth noting that any suggested grinder settings are always a staring point. Even highly calibrated, professional-use grinders are subject to variation and nuance, but this is even more true of at-home variants. That said, the following should provide a useful springboard into finding your sweet spot:

For a brews up to 750ml... 

  • Timemore C2/Slim – 28 clicks
  • Comandante C40 – 34 clicks
  • Baratza Encore – 28
  • Wilfa Svart – Align the red line with the dot between FILTER and AEROPRESS
  • Wilfa Uniform – 34

For a brews over 750ml...

  • Timemore C2/Slim – 32 clicks
  • Comandante C40 – 36 clicks
  • Baratza Encore – 30
  • Wilfa Svart – Align the red line with the R of FILTER
  • Wilfa Uniform – 37 

As a rule of thumb, taste your coffee and if it's a little thin and sour, fine up your chosen grind, and if it's tasting bitter, astringent and stewed, coarsen it up a little.

Brewing with the Moccamaster KBG Select
After folding your Size 4 filter paper and popping it in the brew basket, we find it easiest to weigh our beans into this and then, when grinding them, quickly rinse the paper under the tap before filling up the reservoir to the desired level. 

It's worth noting that the volumetric markings on the reservoir will not correspond directly to the amount of coffee that eventually finds itself in your glass jug. This is because the grounds retain anywhere between 2 to 3 grams of water per gram of coffee. So, if you fill the reservoir to the 1 litre mark, you can expect a batch of around 850ml of coffee. 

With your coffee ground and added to your rinsed filter paper, simply pop your brew basket in place and flick the start button. In theory, there's nothing nothing else to do but weight a few minutes for your coffee to be ready to drink and enjoy. 

However, we've enjoyed even better results in the cup from the Moccamaster KBG Select by enlisting one small, but for us important, extra step: stirring.

We're aware that this divides the crowd. A relatively expensive brewer, and one that's billed as automated, many are reluctant to have to be present during the brewing process. We completely understand and by simply turning on the Moccamaster and walking away you'll still get very tasty cups of filter from the process. However, we very much advocate getting in there with a teaspoon to ensure all of your grounds are evenly wet. You're more reliably going to get nice round, sweet cups of coffee with that extra bit of agitation during the brewing cycle. The fact that you are actually able to access your grounds and water during the process is a major benefit the Moccamaster has over many other automated drip brewers, so we'd highly recommend taking advantage. 

The hotplate
A somewhat hot topic amongst home brewers, we're often asked whether we'd recommend using the hotplate function on the Moccamaster, which, unless you turn the brewer off once it has finished its brew cycle, remains on for 45 minutes after brewing. It is worth noting that your coffee will degrade as it sits on the hotplate and, as time goes on, may become a little briney and less aromatic. For this reason, we prefer to brew enough coffee to drink immediately portioning it out accordingly. Ultimately, though, it all boils down to personal preference. 

Cleaning & Care
The moment your brew is done, throw away your filter and grounds immediately and rinse the basket. Minimising the contact time between the brew basket and coffee oils will reduce the frequency with which you’ll need to deep clean the plastic basket with cafiza or a similar cleaning chemical. 

As a rule, if you’re using water that deposits scale, then you should also run through some descalant after 100 brew cycles. This is easy to remember if you’re buying packs of 100 filter papers. At the same time, I’d recommend filling the basket with Cafiza or something similar and scrubbing with a brush to get into the ridges and get rid of any built up flavour taint. 

The Moccamaster KBG Select is available in the hardware section of our online shop. If you have any follow-up questions on getting more from this brewer, be sure to contact our Home Brewing Helpdesk on betterbrewing@workshopcoffee.com. 

For the Outdoors: Our Latest Brew Bundle

There's something about brewing and drinking coffee in the outdoors. Perhaps it's the fact there are fewer distractions, or maybe it's just the novelty of spending some much-needed time away from familiar surroundings.

Regardless of the reason, the process of brewing away from the kitchen counter can often create a heightened experience in both the making and the consuming. It was this level of enjoyment that we wanted to capture and share with our newest brew bundle, For the Outdoors.

We've brought four pieces of brewing apparatus together that allow for the enjoyment of exceptional coffee wherever you find yourself. 

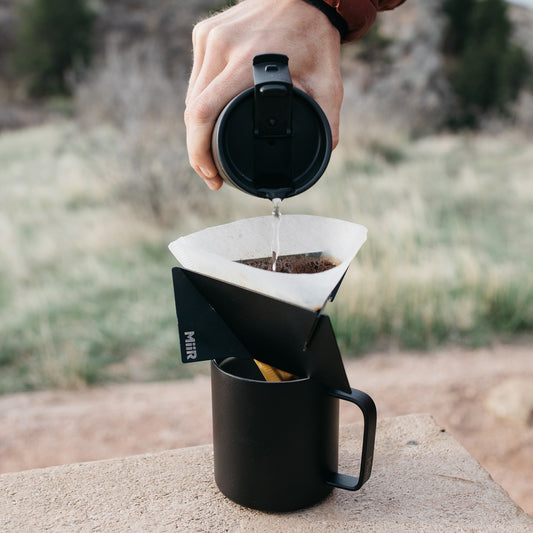
It centres around MiiR's Pourigami, a durable and de-constructable coffee brewer. Arguably the world's most compact pourover, its three stainless steel panel quickly and easily interlock to create an on-the-go drip brewer that's simple to use and even easier to transport. When not in use, it packs down into the included case and fits into your backpack or back pocket.

This is combined with MiiR's 12oz Camp Cup – a 21st Century homage to its well-known and much-loved counterpart. Striking a sleek silhouette, its double wall vacuum insulation locks in temperature for longer, whilst its powder coated stainless steel finish ensures a robust and hard-wearing vessel that's designed to go wherever you are.There are a total of 12 colours and designs to choose from. 

Finished with a 250g bag of whole bean filter coffee from our rotating seasonal range and a pack of 100 1-cup V60 filter papers, you'll have everything you need to begin brewing immediately. 

Perfect for those preparing to spend a summer outside, it's also ideal for travelling and for those looking for a space-saving home or office coffee set-up. 

Our Brew Bundle: For the Outdoors is available to purchase here. Combining the items allows for a £9.50, or 13% saving. 

Timemore’s Chestnut Slim Hand Grinder

The Chestnut Slim grinder from Timemore is a really high spec, but accessibly priced, hand grinder which we’ve been thoroughly impressed with in our testing. The following relays our experiences with the Timemore Chestnut Slim, but if you’d rather experience it in video form, head straight to the bottom of this piece or click here.

An Overview
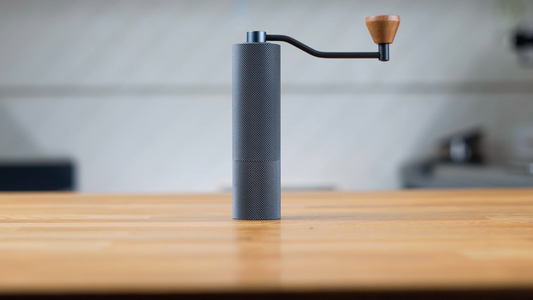
Equipped with 38mm hardened stainless steel conical burrs, these are designed primarily for filter brewing, but there is also an option to upgrade the burr set to Timemore’s ‘Spiked to Cut’ stainless steel burrs, or their 6 point titanium coated burrs if you want to prepare your coffee as espresso. The solid metal chamber of the Chestnut Slim means that the drive shaft is held securely in place and offers that bit more durability and an improved grind profile versus the Timemore Chestnut C2’s moulded plastic chamber.

Weighing just 430 grams, the Slim can be conveniently disassembled and broken down into component parts for travel – and that’s all made even easier using the included travel case. At just 45mm in diameter, it also fits perfectly inside an Aeropress, and the wooden handle is removable, saving even more space. It then magnetically clicking back into place when you’re ready to grind. 

The outer casing of the grinder has a diamond patterned knurled finish, providing a textured grip, which makes the grinding experience that little bit smoother and ergonomic. The design of the handle and bearings inside the driveshaft all contribute to a very smooth grinding action, and we’re really impressed with the speed of the grinder – when grinding for a single cup V60, we’ve consistently been able to grind 15g of coffee in around 20 to 25 seconds without breaking a sweat. 

Grind Adjustment & Recommended Settings
The grinder can be adjusted by fully closing the adjustment dial to the ‘zero position’, winding it all the way around clockwise until the crank handle ceases to move and then counting the clicks back to your desired grind setting

When it comes to dialling in for specific brew methods, there are some really useful jumping off points mentioned in the instruction manual that comes with the hand grinder. These are useful in guiding you before you settle on your own preferred grind settings for whatever brewer you’re using to make your coffee,  but we have also trialled the grinder to establish our own suggestions:  

Aeropress (1 minute steep): 16 clicks
Aeropress (2 minute steep): 19 clicks
V60 (single cup 15g): 18 clicks
V60 (two cup 30g): 22 clicks
Clever Dripper: 20 clicks
Steepshot: 15 clicks
French Press (500g): 24 clicks
French Press (1 litre): 27 clicks
Chemex (1 litre): 32 clicks

The maximum capacity of the Chestnut Slim is around 28g of whole bean coffee at a time if you’re using lightly roasted, dense beans. Any more than that and you’re really starting to push what the chamber and the grounds bin are capable of holding.  

Additional Features
With narrow hand grinders, it can be tricky to get your beans into the grinding chamber tidily. Timemore have made this a little easier by mounting the stabilising arms deep within the chamber, making this process considerably easier. We’ve found that weighing into the grounds bin of the grinder also makes it easier to load your beans more efficiently.

Another particularly thoughtful element of the Chestnut Slim’s design is the fact that the burrs are recessed into the body. This means you’re able to balance the grinder on your counter whilst weighing out your beans – a really nice feature that isn’t present in every hand grinder. 

Cleaning & Maintenance
After grinding, you can use the included cleaning brush to sweep out any chaff or bits of ground coffee that might cling to the burrs because of static build up. The amount of ground coffee retained is fairly negligible and we haven’t found the need to updose to account for grinds retention in this particular grinder. 

Following a fair bit of usage, you’ll want to deep clean the grinder, which is also fairly easy to do. Screw the grind adjustment dial to the coarsest setting and as you keep spinning it will come off completely, allowing you to access the burrs inside. Keep track of the order of each component you pull out so that can assemble it again properly in the correct order. The instruction manual will help you out here if you get a bit lost, so we’d recommend holding onto it. 

Nicely finished, the Chestnut Slim enlists durable, quality materials that make for a high spec hand grinder. Nice to hold, smooth to grind with and super adjustable, it’s priced appropriately and accessibly compared to other hand grinder options of a similar spec, and very capable of making delicious coffee on the go or with very little effort at home, regardless of your chosen filter brewing method.

You can find the Timemore Chestnut Slim Hand Grinder in our Online Shop.

Introducing the SteepShot Immersion Coffee Brewer

Allow us to introduce the SteepShot, a new breed of coffee brewer.

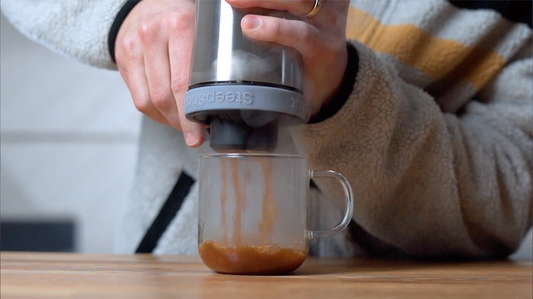
Designed by Ari Halonen in Norway, this intelligent and considered 1-cup coffee maker utilises pressure to create delicious coffee simply and speedily. 

Having spent the last few weeks brewing almost exclusively with the SteepShot, and having enjoyed the process immensely, we wanted to share our experiences with you. If you'd rather watch our overview than read it, you can access the video here or at the bottom of this piece. 

Why is the SteepShot different?

We first became interested in preparing filter coffee inside a pressurised brewer since Gordon Howell won the UK Brewers Cup championship in 2015. Jeremy Challender then won the next year brewing inside a regular Thermos before decanting and filtering. 

This approach can produce a really fantastic cup, but as well as being a little slow and messy, the techniques – both of which involve repurposing numerous pieces of drinkware and kitchen equipment – highlight the potential of the SteepShot to produce unique, delicious cups of coffee.

It truly is unlike anything else we've brewed with. Developed by Ari Hanolen in Norway, the unique, patented brewing technology permits the brewer to utilise the benefits of brewing in a pressurised environment, whilst keeping the process fairly simple, with clean down being much easier to handle.

It isn’t like espresso or stovetop brewing, which are essentially pressurised percolation brew methods, and it isn’t like a regular immersion method such as French Press, Clever Dripper or Aeropress, as it utilises the pressure built up within the chamber to speed up the brewing process. 

Ostensibly a single-cup filter brewer, it requires quite a bit of headspace to allow pressure to build up inside the chamber to accelerate the extraction process, SteepShot's main benefit is that this allows you to brew faster and still achieve nice high, even extractions without some of the more common obstacles faced in filter brewing, like channelling – where the water effectively ‘misses’ pockets of your ground coffee. 

Components & Assembly

At first glance, the brewer might look a touch complicated when compared to a regular pourover, which is just one piece of brewing kit. However, with only one more component than the AeroPress, it all fits together easily and is incredibly intuitive to use. 

Like any coffee brewer, there will be a certain part responsible for actually filtering the grounds out of the brewed coffee, and in the case of the SteepShot, this is a perforated metal disc. The disc that comes with the brewer has holes that measure 100 microns, which is relatively small and will catch most if not all of your coffee grounds even if you’re grinding quite fine. If you like the fuller body and mouthfeel of coffee from a French Press, but don’t like waiting for so long to let it settle to deal with the sediment that tends to come with it, then this provides a nice solution. This filter isn’t going to create anything viscous and heavy like coffee from a Mokapot or espresso machine, but the brewed coffee tastes a little creamier and rounder than that prepared with an AeroPress of Clever Dripper. 

If you favour clarity of flavour and a slimmer bodied cup then there are a couple of alternatives available. You can buy a second disc with 60-micron holes, which will help further reduce the sediment in the cup. Otherwise, there’s also the option of using AeroPress filter papers for an even cleaner cup, but they obviously aren’t reusable in the same way that these metal filters are. 

The metal filter disc sits into a filter holder cap and is then locked in using a ring that sits above the metal or paper filter. 

The last part of the SteepShot is called the Deflector, which is a lever that screws onto the lid to create an airtight seal. It contains a small rubber O-ring, which is integral to the brewing process as it's what creates a seal and helps create the pressure.  

Once assembled, everything is placed onto the brewing chamber, which is double-walled stainless steel, so you can add boiling water to it whilst still being able to comfortably pick it up and hold it.

Our Recommended SteepShot Recipe

We'd highly recommend experimenting with the SteepShot and the main ways you can do that are by altering your grind size and steep time. The rule of thumb to follow is that a finer grind will require less brewing time, whilst grinding coarser will require a longer steep. 

However, we've been getting excellent results with the following recipe:

  1. Add 16g of coffee to your brew chamber, followed by of 250g boiling water (opt for clean, soft water to improve cup clarity and enhance flavour notes – we recommend using a water filter jug).
  2. Start your timer and seal the brewer.
  3. Swill to ensure the slurry is properly mixed.
  4. At 50 seconds, swill again and then upend the brewer.
  5. At 1 minute, point the deflector into your cup and release the SteepShot.
  6. Allow the brewer to fully drain, which will take between 15 seconds and 1 minute depending on your preferred filter (100 micron, 60 micron or paper).
  7. Disassemble and rinse off all the components before brewing again.
  8. Clean in the dishwasher or with hot soapy water.

Where to Set Your Grinder for Your SteepShot

As each grinder will be subtly different as a result of manufacturing discrepancies and the degree of wear experienced by their burr sets over time, the following setting recommendations should be treated as jumping-off points. However, the following grind settings are where we'd suggest starting from to create a predominantly sweet cup, with integrated acidity and minimal bitterness. To learn more about how to approach grinding your coffee you can watch our video here.

  • Baratza Encore – 12
  • Wilfa Svart – Set the hopper so you can see the "SS" of AEROPRESS
  • Wilfa Uniform+ – 21
  • Fellow Products' Ode – 1.5

Cleaning & Other Considerations

Dispensing the grounds isn’t quite as simple as with the Aeropress or a pourover, but you easily knock your spent coffee out into your compost bin or rinse the brewing chamber and catch the grounds in a little sieve as you discard the water into a sink. If you’ve got any extra boiling water you can also brew an empty chamber and use that to clean out the brewer and your sink quite nicely. However, we do recommend either placing the brewer in the dishwasher or cleaning it with hot, soapy water to remove all of the coffee oils and avoid tainting subsequent brews. 

No brewer is without its own set of hazards, to it's also worth considering how to use the brewer safely. Once you’ve added your coffee and hot water and sealed the lid, the inside is pressurised and so you should never open the deflector when the brewer is upright, as coffee can spray out upwards. 

The other point is that when you’re ready to release the coffee into your cup it will come out quickly accompanied by some steam, so keep your fingers nice and clear and on the deflector lever, with the opening lowered down into your cup to reduce the risk of spilling coffee everywhere.

Experimentation

Ultimately, the best SteepShot recipe and technique is the one you most enjoy making and drinking and so we encourage getting familiar with the brewer by experimenting. 

The main ways you can tweak your SteepShot technique are by altering your grind size and steep times, as well as by playing around with different filtering mediums. You can definitely trial super quick brewing styles with a nice fine grind, and SteepShot themselves claim you’re able to get a nice extraction in just 30 seconds. 

Whilst initially dubious about this claim, we've found that if we move through the steps involved in preparing a cup very quickly, then a fast but impressive and full extraction is indeed possible. Unlike a quickly-brewed AeroPress, we've consistently found that rapid SteepShot brews taste sweet, complete and balanced with a long finish. 

You’ll find that if you opt for the finer mesh filter, and even more so with a paper filter, that your draw-down will slow down a touch, but the pay off is a slightly cleaner cup. Through clarifying the brew liquor more effectively you may find the mouthfeel gets lighter, but flavour clarity can jump up, and so depending on what you want from your coffee, as well as what particular beans you’re using, you can make the decision for yourself. 

The SteepShot is available to buy from our Online Shop here. For UK wholesale enquiries, please contact coffee@workshopcoffee.com.

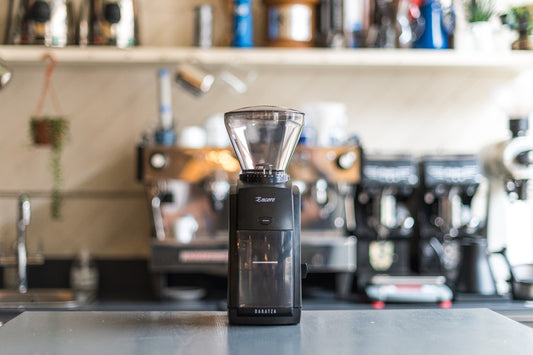
Introducing the Baratza Encore

As our range of equipment and hardware continues to expand, our focus remains on showcasing products we’ve extensively tried and tested to ensure they don’t just complement, but elevate, your home brewing experience.

Sometimes that means introducing a new category of products, like water filters or storage canisters, whilst at others it means extending our existing range to offer greater choice.

With that in mind, we’re pleased to welcome the Baratza Encore to our fleet of coffee grinders. If you’d rather skip straight to a video version of this piece, it’s available to view here.

Dubbed an entry-level grinder, the Baratza Encore is perhaps underselling itself. Whilst it is the brand’s most accessibly priced grinder – and comparably priced to the much-loved Wilfa Svart – it’s a reliable and impressive countertop grinder for the home brewer. The 64mm hardened steel burr is hard wearing and produces a precise grind quality. Two colour options – black and white – allow you to choose a look that blends in on your countertop. 

Setting-up and dialling in
Boasting a small footprint (33.8cm x 14.0cm x 16cm (H x W x D)), the Encore is incredibly easy to set-up straight out of the box. Simply pop the rubber ring into the top of the burr set and affix the switch and you can begin grinding your coffee. However, as with any grinder, the first thing you’ll want to do is dial it in. 

Your grind size can be easily adjusted with a simple twist of the hopper. Following the 40 numbered settings labelled on the hopper, rotating towards the lower numbers will provide a finer grind, whilst twisting toward the higher numbers will coarsen the consistency of your grounds

The instruction manual in the Encore’s box offers some useful jumping off points for where they recommend setting your grinder for different brew methods. However, what these don’t factor in is your recipe (i.e. how much coffee you might be making with that specific brewer). We’ve therefore built on their guidelines to offer some more specific starting points:

AeroPress
1 minute brew time, 15g coffee to 230g water, inverted – Setting 12
3 minute brew time, 16g coffee to 250g water, regular – Setting 15

V60
1-Cup, 15g coffee to 250g water – Setting 14
2-Cup, 30g coffee to 500g water – Setting 20

Clever Dripper
25g coffee to 400g water – Setting 18

Chemex
60g coffee to 1000g water – Setting 32

French Press
45g coffee to 750g water – Setting 26

MoccaMaster
36g coffee to 600g water – Setting 25
75g coffee to 1250g water  –Setting 30

Whilst more specific than the manual’s instructions, we still view these as starting points. Each grinder will be calibrated slightly differently, so be sure to find the grind size that works best for you in the cup. You can find more detail on how to approach your grind size in this video.

Cleaning & Maintenance
Keeping your Encore clean is incredibly straightforward. Remove the hopper by rotating it to the coarsest setting and lifting it out. This will reveal the rubber seal and burr set below. Removing both, the stiff-bristled brush included with the grinder allows you to remove any built-up fines from the seal and the burrs.

To maintain consistently clean cups of filter coffee we recommend carrying this out at least once a week if you’re using the grinder on a daily basis, and monthly if you’re just using it at the weekends. 

Perhaps one of Baratza's most commendable and appealing qualities is their commitment to creating products that stand the test of time. As well as allowing for easy removal of parts for cleaning, the Encore has also been designed so that every part of it can be replaced with relative ease. This avoids the challenge of built-in obsolescence that many electronic devices face and helps ensure the product will be part of your home brewing routine for years to come. 

To find out more about the Baratza Encore, you can watch our video below, and find more technical information and shop the product here.

Our audio-enabled Brew Guides

We’re always looking for new ways that we can help people to brew the best coffee outside of our coffeebars. It’s the reason we began hosting our hands-on, Saturday morning Home Brewing Masterclasses over six years ago and which now take place at our Roastery in Bethnal Green. It’s also why we share our hard-won experiences with a range of brewing equipment with you, be that via thorough testing in the Roastery or taking some of that equipment into environments it’s less than familiar with.

In making this information available, we hope to better equip coffee lovers with the knowledge and tools they need to enjoy exceptional coffee whatever their level and wherever they might find themselves.

Most recently, we’ve been working on augmenting our Online Brew Guides, aiming to make them even more useful for home brewers. Pairing up with London-based voice consultancy and design studio, Vixen Labs, we’ve spent the past couple of months bringing our step-by-step guides to life as voice-enabled audio guides and are proud to introduce you to them.

Introduced by our Head of Quality, James Bailey, the Workshop Coffee Alexa Skill is now available to download and use from the Amazon Alexa Skills Store and contains audio brew guides for our favourite brew methods: AeroPress, Clever Dripper, French Press, MoccaMaster and V60.

Much of the information outlined will be familiar to those that have used the online guides, as we walk through the required equipment, ingredients and crucial steps involved in creating a consistently delicious cup of coffee. However, there is one particularly big, and very exciting, development that the audio guides bring with them: their hands-off nature. Conversing with an Alexa smart speaker, listeners’ hands are entirely freed up to grind, pour and plunge as they listen along and prepare their brew. This, we hope, makes them even more useful to even more people.

The guides also contain a number of additional features.

Built-in, voice-activated timers mean you can be sure you’re perfectly dialled in to experience the vibrant, nuanced flavours of your chosen coffee (whilst remaining in control of when said timer starts). The Alexa Skill also contains a tasting tips section, where James explains what to look out for in each cup, helping listeners to better understand what it is they love about some of their favourite coffees and like a little less about others.

Available to download from the Amazon Alexa Skills Store now, you can find it by saying “Alexa, open Workshop Coffee”. Alternatively, follow this link. 

With special thanks to Jen and James of Vixen Labs for their support, help and expertise in bringing this project to life.

Sign up for our latest news, coffees, tips and special releases